

 VIII

Create a Blog
Start a blog in Proferex and see how readers find their way around it.
This page shows you how to create a blog: a home for your articles, with its own author, look, and domain. You can run more than one blog from the same account, for example one blog per brand or per niche.
A blog in Proferex is a complete website. It has a home page that lists your articles, a page for every article, category and author pages, and a privacy policy and terms page. You write the content. Proferex builds the pages, the navigation, and everything search engines need to find them.
Your blogs
Go to Blog → Blogs in the sidebar to see your blogs. Click a blog's row to open its overview. See A blog's overview.
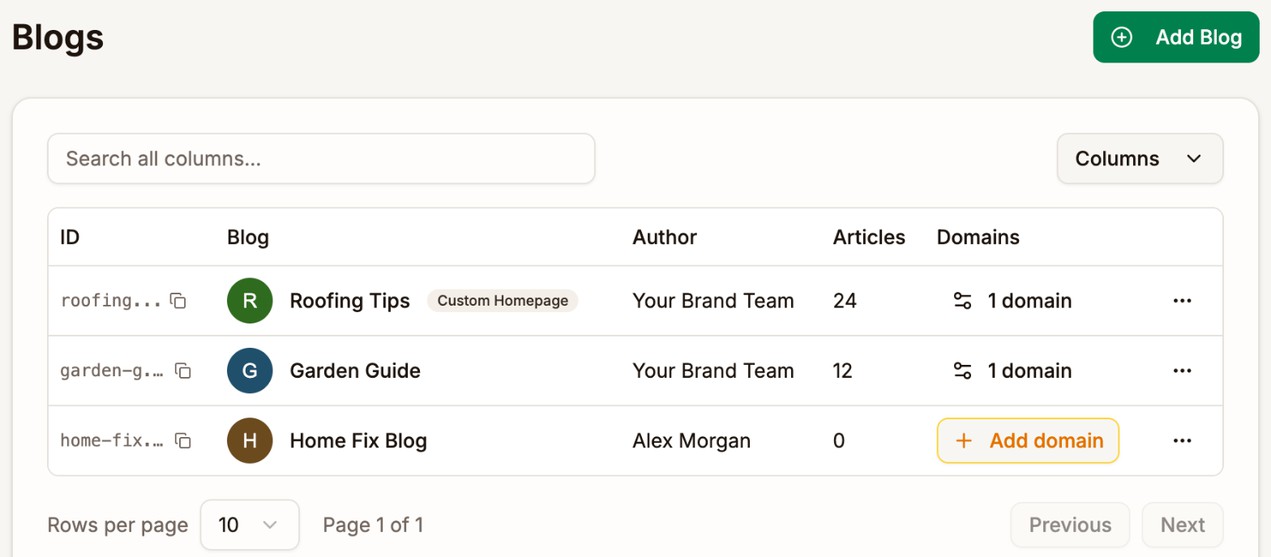
| Column | What it shows |
|---|---|
| ID | The blog's ID. Click the copy icon to copy it. |
| Blog | The blog's name and author picture. Custom Homepage shows when the blog's home page uses your own content instead of the article list. See Pages. |
| Author | The author name readers see on your articles |
| Articles | How many articles the blog has, published or not |
| Domains | How many domains the blog is served on. Add domain means readers can't reach the blog yet. |
A blog's overview
A blog's overview shows everything about that one blog on a single page, so you can see what it has and jump straight to what you want to change.
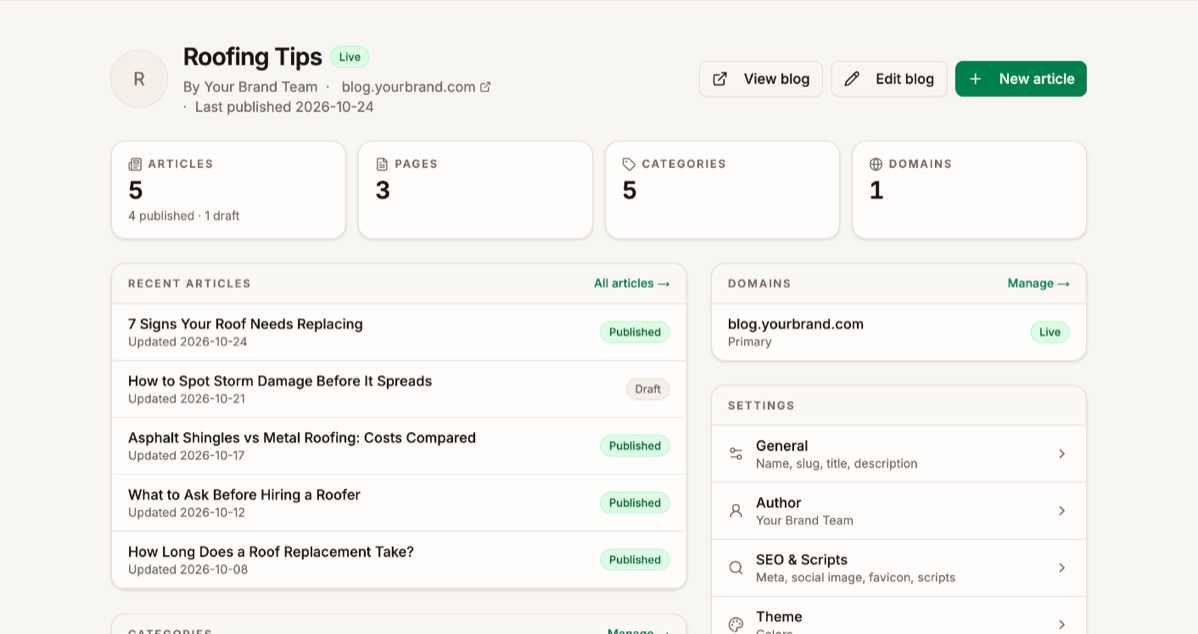
- The top shows the blog's name, whether it is Live or has No domain yet, the author, its main domain, and when it last published an article. Click the domain to open the live blog. View blog, Edit blog, and New article are on the right.
- The tiles count the blog's Articles, Pages, Categories, and Domains. Click a tile to open that list for this blog. The Articles tile also splits the count into published, scheduled, and drafts.
- Recent articles lists the six newest articles with their status. A scheduled article shows the day it goes live. Click an article to open it in the editor, or All articles to see the rest.
- Pages lists the blog's pages with their addresses. Custom homepage marks the page your blog uses as its home page, and Draft marks a page that isn't published.
- Categories shows each category with how many articles it has. Click one to see only those articles.
- Domains shows each domain and whether it is Live, Pending SSL, or has an error. A blog with no domain shows a link to add one.
- Settings lists the parts of the blog's settings: General, Author, SEO & Scripts, Theme, and Navigation. Click one to open the blog's settings on that tab. See Blog Settings.
- Delete blog removes the blog. See Delete a blog.
The Articles, Pages, Categories, and Media Library screens each have a Blog overview link next to their title. It takes you back to the overview of the blog whose tab is open.
Create the blog
- Go to Blog → Blogs.
- Click Add Blog. The Add New Blog dialog opens.
- On the General tab, enter a Blog Name, such as
Roofing Tips. The URL Slug fills in for you. - On the Author tab, enter an Author Name. It is the name readers see on every article.
- Fill in any other tabs you want now. You can change all of them later.
- Click Create Blog.
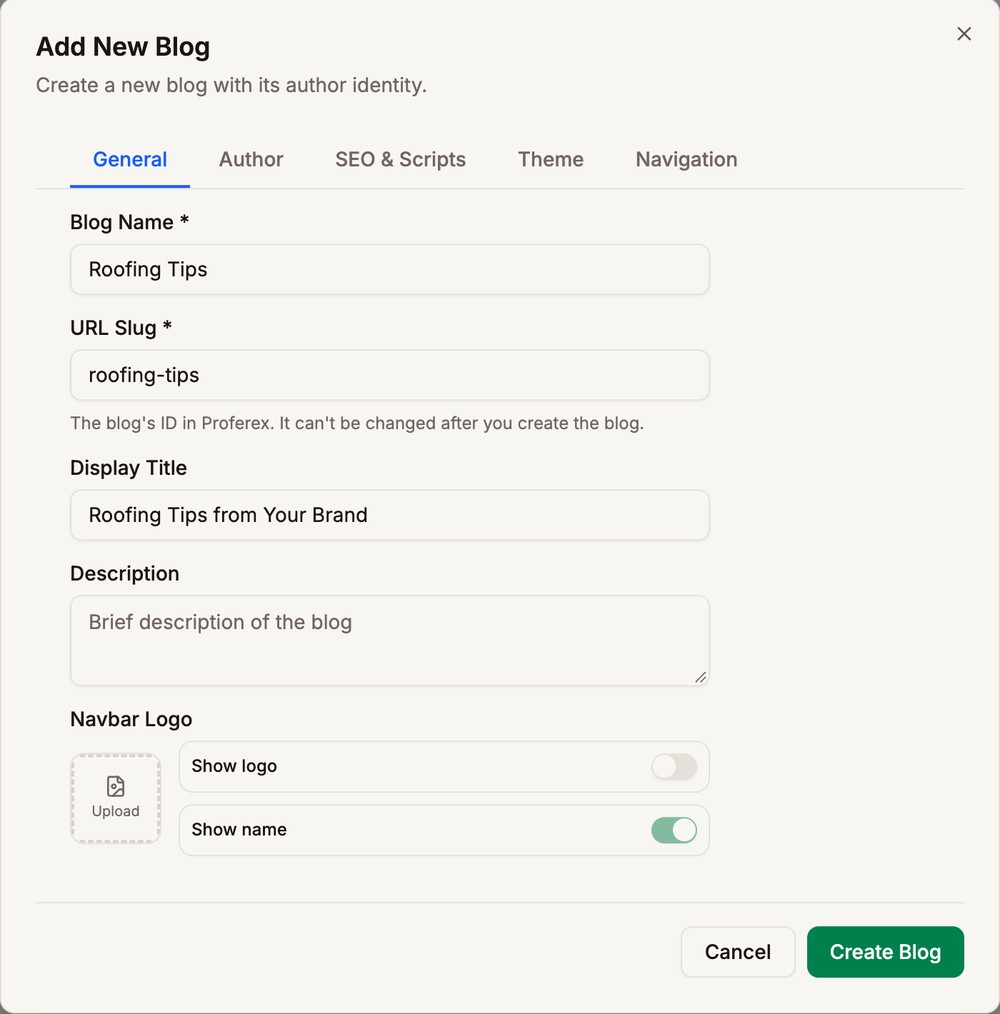
Blog Name and Author Name are required. Every other field is optional. Blog Settings explains each tab.
The URL Slug is the blog's ID in Proferex, such as roofing-tips. Readers never see it. If another blog already uses the slug, Proferex adds a number to the end, such as roofing-tips-2. You can't change the slug after you create the blog.
What every new blog starts with
Every new blog comes with three pages, listed in Blog → Pages:
| Page | Address | Starts as |
|---|---|---|
| Home | / | Published. It lists your articles. |
| Privacy Policy | /privacy-policy | An empty draft |
| Terms of Service | /terms-of-service | An empty draft |
Write and publish the two policy pages before you send traffic to the blog. Readers who open them see a page-not-found error until you do. See Pages.
A new blog has no public address. Connect a domain so readers can reach it. See Blog Domain.
How readers see your blog
Once the blog has a domain, such as blog.yourdomain.com, Proferex serves these pages on it:
| Page | Address | What's on it |
|---|---|---|
| Home | blog.yourdomain.com | Your latest 12 articles, with links to older ones. Or your own content, if you set up a custom homepage. |
| Article | blog.yourdomain.com/your-article | The article, its categories, author, and date, with share buttons |
| All articles | blog.yourdomain.com/articles | Every published article, newest first |
| Category | blog.yourdomain.com/categories/roof-repair | The articles in one category. See Categories. |
| Author | blog.yourdomain.com/authors/your-brand-team | The author's picture, role, biography, links, and articles |
| Your pages | blog.yourdomain.com/about | Pages you write, such as an About page. See Pages. |
Each article card on the home page shows the article's featured image, categories, date, title, and excerpt, with a Read More link.
Proferex also keeps a sitemap at /sitemap.xml and a /robots.txt file up to date for search engines. You don't need to set either up.
New articles and changes show on the blog within a minute of publishing.
Other blog actions
The menu on each blog's row in Blog → Blogs also has:
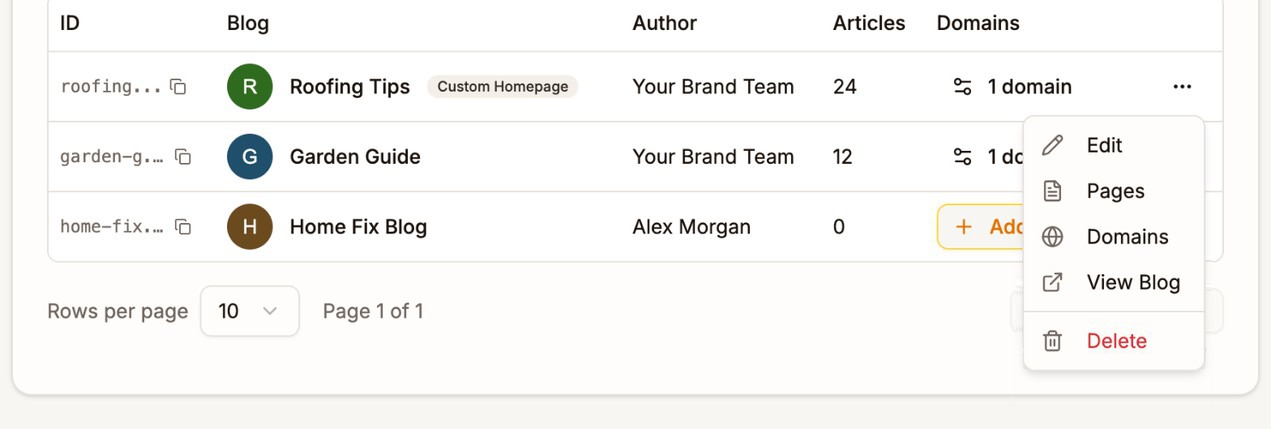
- Edit, to change the blog's settings. See Blog Settings.
- Pages, to edit the blog's Home, Privacy Policy, Terms of Service and other pages. See Pages.
- Domains, to connect the domain the blog is served on. See Blog Domain.
- View Blog, to open the live blog. It appears once a domain is working. If the blog has more than one domain, pick the one to open.
- Delete, to remove the blog.
Delete a blog
You can only delete a blog that has no articles, categories, or domains left. If any remain, Delete opens Cannot Delete Blog with a list of what to remove first.
- Delete the blog's articles in Blog → Articles.
- Delete its categories in Blog → Categories.
- Remove its domains on the blog's Domains page.
- Open the menu on the blog's row, click Delete, and confirm.
Deleting a blog removes it and its author profile for good. It can't be undone.
Next step
Give the blog its look, author details, and navigation. See Blog Settings.